http://shop.pitsco.com/store/default.aspx?groupID=135
Medieval Machines Kit Item # W37789 $21.95
The kit has a grade level of Intermediate/Middle School
Some of the great things about homeschooling are the flexibility to explore concepts not directly related to our current studies and taking time to do hands-on projects. One of the challenges (at least for me) to these benefits is gathering together all the materials for a project. So I am excited to find easy kits to help me provide imaginative hands-on learning experiences.
Pitsco Education specializes in providing various products; kits, hands-on activities and projects in the subject areas of Math, Science, Technology and Engineering.Their products are available for K-12 grades.
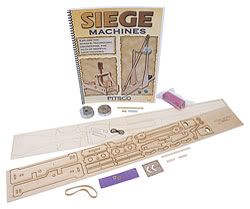 Currently we had the opportunity to review some very nice siege machine kits. Pitsco recently sent TOS Crew members catapult and trebuchet kits along with a siege machine booklet. Each machine kit contained a piece of bass wood with all the parts die cut, numbered, and ready to punch out, with instructions. The trebuchet also came with the wire (paperclips), thread, and fabric needed to make a working model. Clay was also included in the set. After all, what fun is it to make siege machines and not have anything with which to test them?
Our Experiences
My 10 year old daughter was excited to have the opportunity to make and test this catapult and trebuchet. She is very interested in science and putting things together. We started with the catapult kit and I am glad we did. She very easily put together the majority of this machine. The instructions were clear and straightforward enough that she was able to do it herself. I was available so she could double check if she had a question.
 However, when it came time to put the arm and trigger on my husband stepped in to help her out.We found it was necessary to sand the center of the dowel in order to get it to fit on the catapult arm. The holes on the frame of the catapult where the dowel goes through were slightly too big. The solution for this was to use a lot of wood glue, lots of drying time and gluing the outside donuts on. Attaching the trigger also required assistance from dad, with a little more sanding and filing to get everything working smoothly.
The finished size of the catapult is about 6 inches long and 5 inches high. The catapult is surprisingly heavy and sturdy, which was a pleasant surprise. It stayed in place and didn't jump around when flinging projectiles across the room. The projectiles really flew. We weren't able to make projectiles the sizes suggested in the lesson plans since I don't have a way to measure grams. Instead we used a kitchen scale to measure an ounce of clay and then guesstimated sizes for fractions of an ounce.
The trebuchet kit was was more difficult to assemble. Daughter was able to put together the frame and make the measurements for the center strip,but she ran into difficulty after that. The first challenge was making notches in two of the pieces used to support the bottom of the frame. She had not used a craft knife before and was reluctant to do this step. She also was not able to bend the wires to make the various catches and hooks necessary. A template included with the kit helped to make sure they were bent just right. The steps for making the sling were also fairly difficult for her. So my husband helped her to finish the model.
 These were biggest difficulties with the trebuchet.
- The hook and string application were challenging until the Shoe Goo was brought out.
- Epoxy was used to attach the ferrule to the arm.
- Making the sling was challenging since some of the photos were fairly dark.

Over all, my husband said his model building experience was a plus in constructing the trebuchet as he felt the instructions assumed building knowledge instead of spelling out some helpful tips. The instructions gave the end result in many places, but left the user trying to figure out how to get to that point. He felt the catapult directions were very user friendly and helpful. He also thought the drying times in both directions were a little short. Some of this may be due to the fact we choose wood glue for most of the work.
The finished size of the trebuchet is approximately 12 inches long and 15 inches high, when the weights are removed.
The trebuchet was also very good at throwing projectiles across the room. Generally things flew farther with the trebuchet than the catapult.
We found that using craft clamps came in handy for putting both kits together. This helped to assure a good bond between the pieces.
Both kits require additional supplies. These are materials like:
- glue
- hobby knife
- needlenose pliers
- marker/pen
- sandpaper
- ruler
- scissors
- safety goggles
- toothpick or glue applicator
From our experience I would say that the catapult kit certainly is doable for a 10 year old child with some help, a child a little older would likely be able to do more on their own. The trebuchet kit we found to be more difficult, thus I would say it would be better suited for an older student or someone who has experience with building other models.
Many of the kit components were labelled as assembled in the United States. While I was not able to definitely determine the manufacturing country, I was pleased to see that at least some assembly work was done here in the US.
Other members of the TOS Crew also had the opportunity to use and review the catapult and trebuchet as well. Read what they had to say at the TOS Crew blog.

Disclaimer: I received the above described items in order to be able to write this review. I have not been compensated in any other manner. All views expressed here are solely my own.
Thanks for the great review! I just wanted to let you know that yes, the wood kits and the booklet are manufactured and printed at the Pitsco facility in southeast Kansas.
ReplyDeleteI also passed on some of your comments about our trebuchet building instructions to our technical writing team to be addressed.